
What Is R-Value and Why It Matters
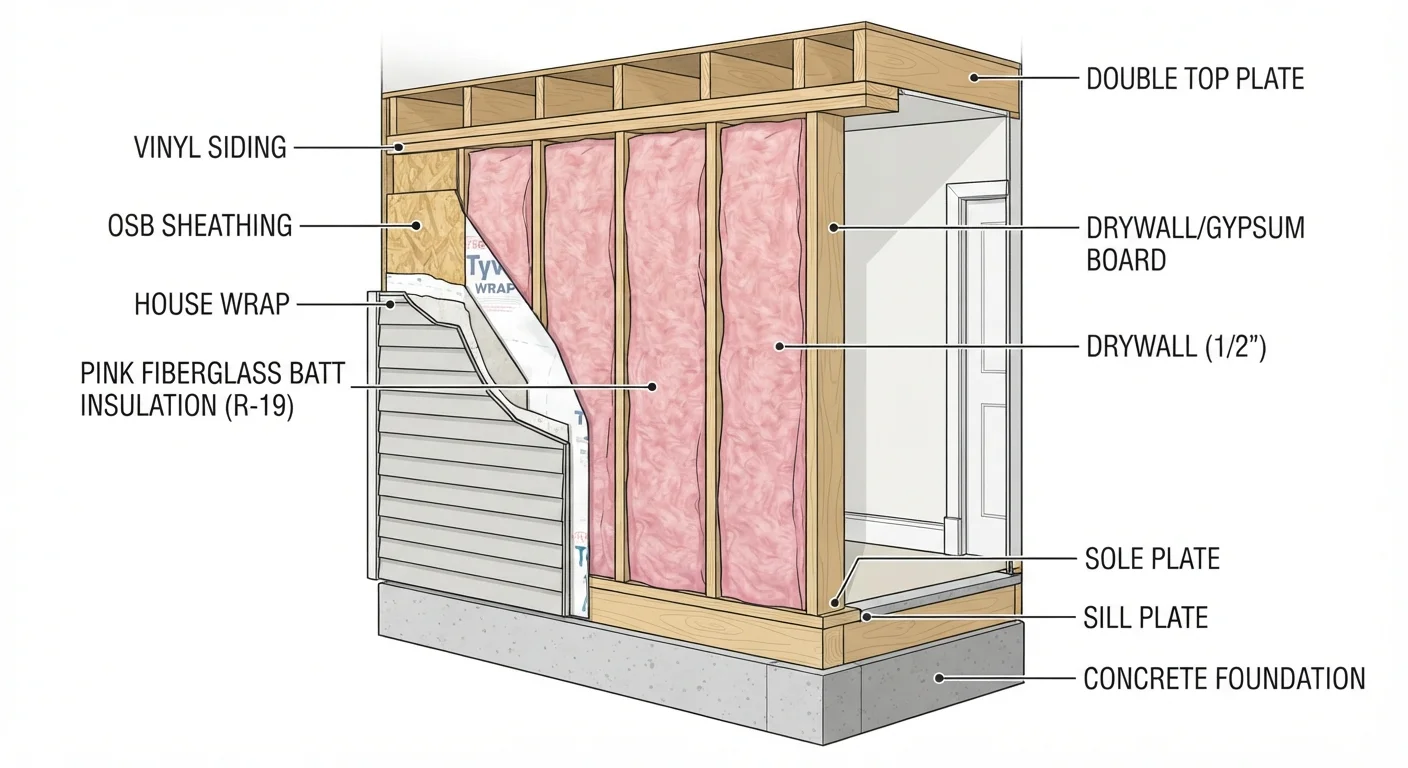
Before you buy a single roll of insulation, you need to understand R-value - the single most important number in home insulation. R-value measures a material's resistance to heat flow. The higher the R-value, the better the material slows the transfer of heat between your living space and the outdoors.
R-value
A number that measures how well insulation resists heat flow. Higher R-values mean better insulating performance.
Thermal bridging
When heat bypasses insulation by traveling through a more conductive material - like a wooden stud - reducing the overall effectiveness of the insulation system.
Air sealing
The process of closing gaps and cracks in a home's envelope to prevent unconditioned air from leaking in or out. Air sealing works together with insulation but is a separate step.
Vapor barrier
A material (often plastic sheeting) installed to slow the movement of moisture through walls, floors, or ceilings, protecting insulation and structure from water damage.
Climate zone
A geographic category defined by the U.S. Department of Energy that groups regions by climate type to guide insulation R-value recommendations.
Rim joist
The piece of framing lumber that sits on top of your foundation wall and closes off the floor framing. It's a common spot for air leaks and heat loss.
Heat always moves from warmer areas to cooler ones. In winter, it tries to escape through your walls, ceiling, and floors. In summer, outdoor heat pushes inward. Insulation's job is to slow that movement, keeping your home comfortable and reducing how hard your heating and cooling systems have to work.
The R-value you need depends on two factors: your climate zone and where in the home you're insulating. The U.S. Department of Energy divides the country into zones (1 through 8, from hottest to coldest) and publishes recommended R-values for each. An attic in Minnesota requires far more insulation than the same attic in Florida.
Common Insulation Materials Explained
Walk into any home improvement store and you'll find several insulation types. Each has strengths, limitations, and ideal applications.
- Fiberglass batts: The familiar pink or yellow rolls. Inexpensive, widely available, and DIY-friendly for stud bays in walls and attic floors. Must fit snugly without compression to perform as rated.
- Mineral wool (rock wool) batts: Denser than fiberglass, more resistant to moisture, and naturally fire-resistant. Also provides better sound dampening. Costs more but performs well in humid or fire-risk areas.
- Blown-in cellulose: Made from recycled paper treated with fire retardants. Excellent for attics and hard-to-reach spaces. Requires a blowing machine (often rentable) and ideally a second pair of hands.
- Spray polyurethane foam (SPF): Expands to fill gaps and creates an air seal simultaneously. Closed-cell foam has the highest R-value per inch of any common material. Large-scale application involves chemical hazards - professional installation is strongly advised for anything beyond small canned foam for sealing gaps.
- Rigid foam boards: Polystyrene or polyisocyanurate panels used on exterior walls, basement walls, and under slabs. Provide a continuous layer with no gaps at studs.
Match the Material to the Location
No single insulation type excels everywhere. Batts work well in open stud bays; blown-in cellulose is ideal for irregular attic floors; rigid foam shines on basement walls. Before purchasing, confirm the material is rated for the conditions - especially moisture exposure - in the space you're insulating.
Where Insulation Makes the Biggest Difference
Not every corner of your home loses energy equally. Prioritizing the right locations gives you the most impact for your investment.
Attic
Heat rises, making the attic the single biggest source of energy loss in most homes. Increasing attic insulation - especially if your current level is thin or uneven - typically delivers the fastest payback of any insulation project.
Exterior Walls
Walls account for a significant portion of heat transfer, but they're harder to retrofit because they're already enclosed. Options include blown-in insulation through small holes drilled in the exterior (then re-patched), or adding rigid foam board to the exterior during a re-siding project.
Crawl Spaces and Basements
Cold floors and moisture problems often trace back to poorly insulated crawl spaces. Insulating the floor above the crawl space or the crawl space walls (depending on whether it's conditioned or unconditioned space) makes a noticeable difference in comfort. Vapor barriers are typically paired with insulation here to manage moisture.
Rim Joists
The rim joist - the framing that sits on top of your foundation wall - is a surprisingly large source of air leaks and heat loss. Cutting rigid foam to fit and sealing the edges with canned spray foam is a manageable DIY task with meaningful results.
Insulation and Air Sealing Work Together
Adding insulation without addressing air leaks leaves much of the benefit on the table. Gaps around recessed lights, plumbing penetrations, and attic hatches can allow significant air movement that insulation alone won't stop. Consider pairing any insulation project with basic air sealing using caulk or spray foam on accessible penetrations.
DIY vs. Calling a Professional
Many insulation projects are genuinely approachable for a first-timer. Others carry risks that make professional help the right call.
Generally DIY-Friendly
- Adding fiberglass or mineral wool batts to an open attic floor
- Sealing rim joists with rigid foam and canned spray foam
- Installing faced batts in an unfinished basement ceiling
When to Call a Professional
- Spray foam (large-scale): Two-component SPF involves isocyanates - chemicals that require respiratory protection and proper training. Improper application also creates uncorrectable problems.
- Older homes with asbestos: Homes built before the mid-1980s may contain asbestos in existing insulation or surrounding materials. Disturbing asbestos without testing and proper remediation is a serious health risk. Always test before working in older homes.
- Encapsulated crawl spaces: Conditioning a crawl space involves vapor barriers, drainage, and sometimes HVAC tie-ins - a system-level project best handled by an experienced contractor.
- Permitted wall insulation retrofits: Some jurisdictions require permits and inspections for wall insulation work. A licensed contractor will be familiar with local requirements.
If you're also navigating the broader financial side of homeownership, the plain-language primer on buying a home covers renovation budgeting as part of the purchase process.
Test Before Disturbing Older Insulation
If your home was built before the mid-1980s, existing insulation or surrounding materials may contain asbestos. Do not disturb, remove, or add insulation on top of suspect materials without professional testing first. Asbestos exposure is a serious health hazard. Contact a licensed asbestos inspector before any work in older homes.
Getting Started: Your First Steps
Feeling ready to move forward? Here's a practical starting sequence for first-timers:
- Request a home energy audit. Many utility companies offer free or subsidized audits. An auditor uses tools like a blower door test and thermal imaging to show exactly where your home is losing energy - so you don't guess.
- Look up your climate zone. The DOE's website maps climate zones by ZIP code and lists recommended R-values for attics, walls, floors, and crawl spaces in your area.
- Check your current insulation. In the attic, you can often see directly how much insulation is present and whether it's in good condition. Many attics have ruler-marked joists to help estimate depth and R-value.
- Verify permit requirements. Contact your local building department before starting. Requirements vary by project type and location.
- Start with the attic. For most homes, adding or topping up attic insulation delivers the best return on effort for a beginner's first project.
If you're a new homeowner still getting oriented, the Buying a Home hub has broader guidance on understanding your property. And once your home is comfortable and organized, you might find our guide to decluttering from scratch a useful next project.
DOE Home Energy Saver
The U.S. Department of Energy's online tool helps homeowners estimate energy use and identify the most impactful efficiency improvements for their specific home and climate zone.
ENERGY STAR Home Advisor
ENERGY STAR's step-by-step guidance on sealing and insulating a home, including which areas to prioritize and how to find qualified contractors for more complex work.
Home Energy Audit Checklist
A walkthrough checklist you can use before or alongside a professional audit to document current insulation levels, visible gaps, and comfort problems room by room.